04 Mar 2005 Another adhesive for gluing on the canopy
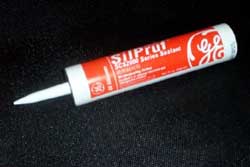
I’ve mentioned Sika as a recommend adhesive for gluing on the canopy, and one of my glastar buddies told me that they use something called GE Silpruf. I bought some from these guys: http://mall.igfarm.com/store/merchant.mv?Screen=PROD&Store_Code=airlinktech&Product_Code=899-0047-0003
and I will probably try it and Sika. The advantage I see of the GE product is that it seems to work even when very cold, or wet. It also does not require priming or UV protection, like Sika. It is nice to have options!
The rest is a copy/paste of a set of instructions for gluing on a glastar window using silpruf, and some of this information could be useful to an RV builder.
A data sheet is available here:
http://www.gesilicones.com/USADataSheets/167.html
1. Mask off the front and back of the window to approx. 1.5” of the edge.
2. Trim perimeter of window to fit inside the joggle without binding.
3. Scribe edge reveal with wet erase fine point.
4. Grind edge to scribe line.
5. Check edge reveal for uniform gap, re-scribe and grind as needed to achieve uniform gap appprox.
1/8-3/16” .
6. Remove window and sand inboard fiberglass joggle edge of fuselage to smooth/straight edge.
7. Replace window and hold in position for even reveal and use a wet erase to trace the inside joggle
edge on the window.
8. Remove window and use 1” blue masking tape to tape along the inside of the window to about 3/16”
of the traced line on the inboard side of the line.
9. Use ¼” masking to tape just to the inside edge of the line taking care not to cover any of the
traced line. Mark the exiting tail of the tape #2.
10. Remove the traced line with moist paper towel.
11. Using ¼” tape, tape 1/16” over the outboard edge of the ¼” tape previously applied. Take care that
the outboard edge of the first ¼” tape is covered. Mark exiting tail of this tape #1.
12. Use 80 grit sandpaper to sand perimeter edge of window until all the grinder marks are gone.
13. Use finer grit sandpaper to sand the perimeter again, removing the 80 grit marks. While sanding
gently roll top and bottom edge of window to achieve a smooth and soft small radius around entire
window.
14. Use 2” blue masking tape to mask off out side edge of window allowing tape to extend over edge
somewhat. Trim overhang off with new razor blade holding blade back toward top of window.
15. Use 80 grit sandpaper to sand bonding surface of window using extreme care not to sand on the ¼” tape. Sand to tape staying away about 1/16” from edge.
16. Clean sanding dust away with a clean, dry, paper towel (no solvents)
17. Apply thin, opaque, layer of silpruf to the sanded bonding area of window. Use finger to smooth and clean excess from edge and top side of window.
18. When satisfied with silpruf application…. Remove the tape marked #1 pulling from the marked tail slowly and pull toward the inboard at a slight angle so not to break the tape.
19. Set window aside and let cure for 12-24 hours
20. Sand bonding surface of fiberglass window joggle until all gelcoat is dull. Lightly sand side of joggle as well.
21. Wipe off inside of plane around window with paper towel dampening with acetone to clean and remove dust. When dry apply 2” beige masking tape to inside of fuselage around window opening. Allow the tape to extend into the opening and trim flush with new razor blade.
22. Using 2” blue tape, mask around the exterior, perimeter, of the window opening allowing the tape to extend over the joggle edge toward the window opening. Trim this excess of with a new razor blade holding the blade at an angle away from the window joggle, toward the fuselage. Trim as smooth as possible and make sure no tape is rolled into the joggle when done trimming.
23. Take pre-cured (2-3 days) silpruf lines and cut pieces (standoffs) off of the line that are about 5/16” wide. Using Ultra gray silicone gasket maker, made by Permatex (available at your local auto parts place), apply standoffs where needed in joggle to support window. Let cure at least 4+ hours.
24. When silpruf (previously applied to window bonding surface) cures and standoffs have cured, trim standoffs a little at a time, with new razor blade, until window sits on standoffs and is flush with exterior of fuselage.
25. When satisfied with depth fitting, locate and drill #40 holes as needed around window to allow the wingnut clecoes to hold the window flush with perimeter of joggle and fuselage. Drill as close to the window as possible without touching the edge of the window with the drill bit. Insert clecoes and check depth, add clecoes where needed. Mark all standoff locations on tape and mark the ones that have a cleco hole adjacent to them. Add additional standoffs where needed using super glue. Trim added standoffs carefully to depth and drill an additional hole for wingnut clecoe Remove clecoes and window.
NOTE: each cleco needs to have a bridge under it and on top of the window. This bridge can be made out of a paint stir stick that is approx. 1/8” thick. The bridge should be about 5/8” long and ¼” wide with a #40 hole drilled in it. Put the bridge on the cleco and then insert the cleco into the hole at the edge of the window. The bridge should ride on the window and the fuselage allowing the cleco to pull the window flush with the fuselage when tightened.
26. Apply thin layer of silpruf to window on the 1/16” gap between the pre-cured color and the remaining ¼” tape. Smooth and rub into gap and onto cured color with finger.
27. Apply generous amount of silpruf to joggle (more …not less is better).
28. Position window in joggle and insert wingnut clecoes, tightening as they are installed. When all are installed, gently push on window around perimeter and recheck that the clecoes are still snug.
29. Use squeegee to remove most of the excess squeeze out around exterior window.
30. Use a radiused (to your specs) tongue depressor tool to smooth out the reveal in between clecoes. Start at a clecoe and drag tool at 90 degrees toward adjacent cleco. Remove tool prior to adjacent clecoe and clean tool. Start again at adjacent cleco and drag tool toward cleco that was the start of the pull. Remove tool from reveal prior to cleco. Continue pulling tool from cleco to cleco until tool comes up clean and the reveal is smooth. Continue this procedure between each cleco.
31. Clean up the interior with a cut squeegee that has a 90 degree corner. Use corner to clean excess silpruf from around the inside edge of the window joggle. Remove most of the excess with the squeegee held at 90 degrees to the joggle and a low angle to the window. Leave a thin film of silpruf around perimeter of window so the 1/16” between the tape and the previous cured color is covered completely. When satisfied…remove the ¼” tape marked #2. Start with the exiting tail marked #2. Pull slow as in prior ¼” tape removal and do not break tape. Let cure 2-4 days.
32. Remove clecoes and “fix” all cleco locations by removing high part of silpruf that was under cleco bridge with a razor blade or exacto knife and applying fresh silpruf to area and bending with radiused tool. Let cure 1 day and remove all tape and cover window to protect
Sorry, the comment form is closed at this time.